Tuesday, February 7, 2012

Chocolate Dipped Homemade Vanilla Marshmallows


A wonderful friend of mine has had a "hankering" for marshmallows the past week, and I thought I'd give a homemade marshmallow recipe a try. Since I don't have a lot of experience working with gelatin, I tried a base vanilla recipe from www.mybakingaddiction.com. This website is by far my favorite for everything baking. Awesome recipes and tips, and where I got my inspiration to start my own blog! Definitely check it out. :)

So for the marshmallow, I used Homemade Vanilla Marshmallows from My Baking Addiction. These little babies alone are a treat, but I wanted to put a little spin on them by dipping them in chocolate and other sweet treats!  Here are a few ideas to get your brain going - the possibilities are endless!

Crushed Graham Crackers
Crushed Oreos
Crushed Almonds (or any kind of nut)
Reese's Pieces
Rice Krispies
Coconut
Chopped White Chocolate
Caramel Pieces
M & M's

I used coconut and graham crackers because it's what I had in my cupboard, but my oh my! The graham cracker ones tasted just like a s'more and the coconut ones tasted just like a Mounds Bar (my secret obsession). Next time I'm going to put almond extract into the marshmallow mixture to make an Almond Joy Dipped Marshmallow. YUM! Speaking of extracts, using peppermint extract would make a tasty peppermint marshmallow too.

The gelatin and water reacting together

Finished gooey marshmallow goodness!

To make the chocolate coating, melt 1 tablespoon shortening and 1 cup semi-sweet chocolate chips in a sauce pan over medium heat until melted. Turn off heat, but keep the pan on the burner. The residual heat will keep the chocolate melted while your busy dipping. Make sure to have your dipping condiments prepped before you start the chocolate coating. Below is a picture of how I let the chocolate dry - upside down on a raised cooling rack.. If you don't have a raised cooling rack, just take a few books and stack them on each end of a standard cooling rack. Voila - instant raised cooling rack! :)


Let me know what dipping ideas you have! Happy Baking!!

Thursday, February 2, 2012

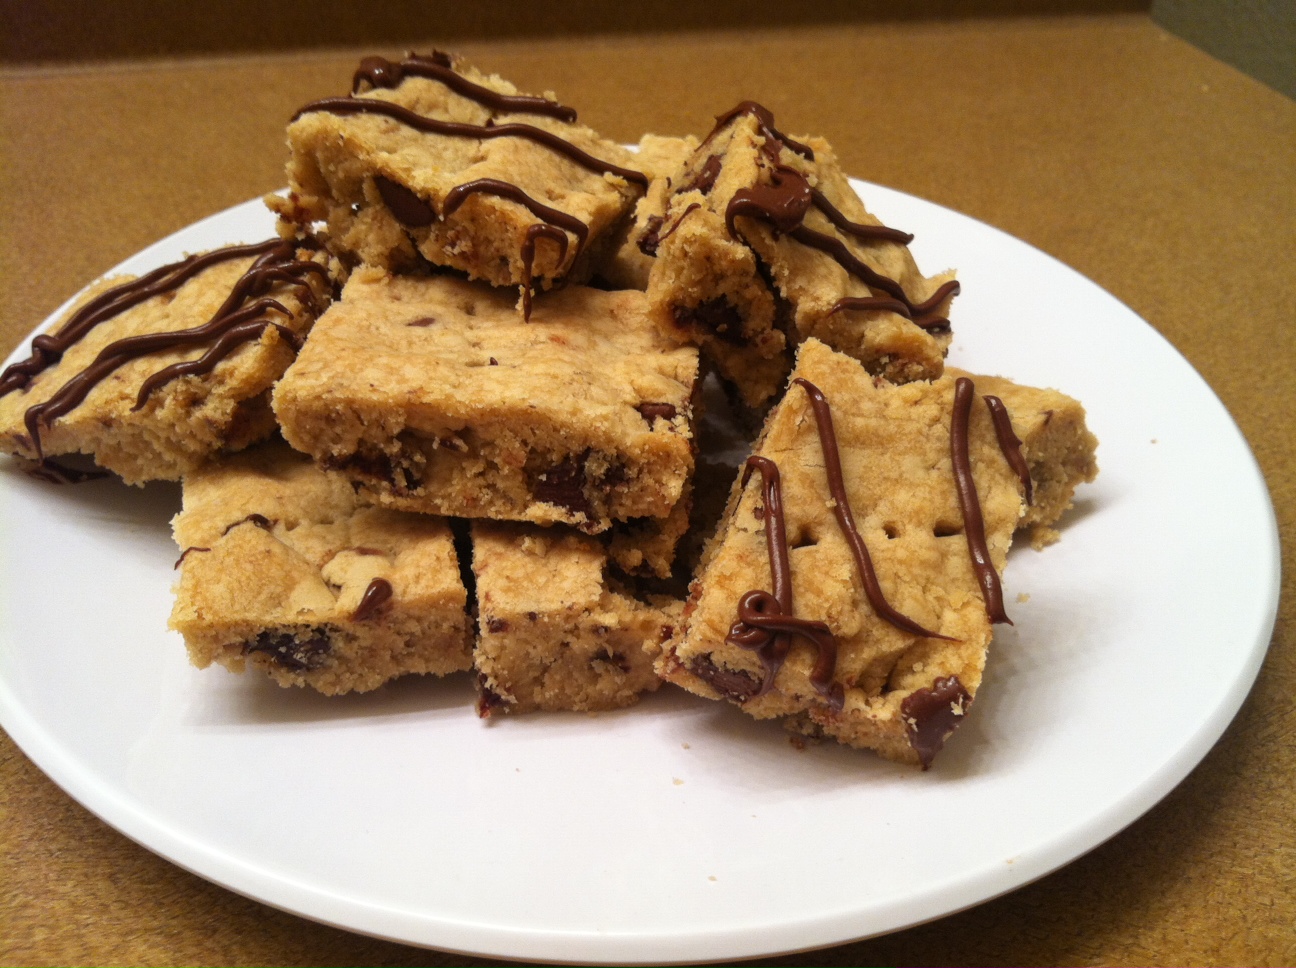
Espresso Shortbread


Shortbread is one of my favorite baked goods. So flaky and delicious, I could probably eat the whole pan. For these espresso shortbread's, I used Starbucks instant VIA. Whenever I have a recipe that calls for coffee/espresso, it's my go-to brand. I may be a bit biased since I work there, but it really does bake incredibly well.  This recipe would be really delicious with walnuts too!

RECIPE

1 1/2 cups unsalted butter, softened
3 1/3 cups all-purpose flour
2 tablespoons cornstarch
1 teaspoon salt
1 teaspoon instant espresso
1 teaspoon vanilla extract
1 1/3 cups confectioners sugar
3/4 cup bittersweet chocolate chips, coarsely chopped (more if you want to add chocolate drizzle)

  • Lightly grease a 9x13 baking pan and set aside.
  • Combine the flour, cornstarch and salt in a medium bowl and set aside. Dissolve the vanilla and instant espresso in a small bowl.
  • In a stand mixer or hand mixer, beat the butter, sugar and vanilla-espresso mixture until smooth.
  • Add the flour mixture and chocolate chips in increments on low speed until dough begins to form. 
  • Put the dough in the prepared baking pan and with lightly floured fingertips, press the dough into the pan evenly. 
  • Using a small knife, cut squares into the raw dough. This helps with cutting when the cookies are baked. Prick each square a few times with the tip of the knife to allow air to escape. (Don't worry, they don't look very pretty now but all the holes will dissapear in the baking process). 
  • Place the dough in the freezer and preheat the oven to 325*. Bake for 35-40 minutes or until golden brown, rotating the pan halfway through.
  • Place the pan on a cooling rack, and re-cut the cookies. Cool COMPLETELY before removing the cookies...otherwise you'll end up with shortbread crumbs (which aren't half bad over ice cream). 
  • If you would like to add chocolate drizzle, melt 1/2 cup chocolate chips in the microwave and use a fork to drizzle over the cookies. 
HAPPY BAKING!

Wednesday, January 25, 2012

Chocolate Chip Cookie Dough Balls


Okay, so there's this website...Pinterest, Basically a website that you wonder where the last 2 hours went because you were on it. It's a site FULL of neat ideas, crafty fun projects, DIY, style, food, etc. Best thing since sliced bread, no joke. Anyway, I tried this basic recipe to see how it worked out and goodness gracious! These things are little balls of HEAVEN. They taste just like cookie dough, AND they're safe to eat (no egg!). This is a fantastic recipe to do with kids (if you can keep them from eating it all), and SO versatile! My mind is reeling from all the possibilities...peanut butter cups, butterscotch, almond extract, peppermint patties, walnuts...I could go on forever! I dipped mine in chocolate, but they are delicious without it as well! Below is the base recipe, but let me know what amazing concoctions you come up with!

RECIPE

1 cup salted butter, softened
1 1/2 cups brown sugar
1 tsp vanilla extract
2 cups flour
3/4 cup chocolate chips (mini work best, but regular size is just fine too)

  • Blend together butter and brown sugar until light and fluffy.
  • Add vanilla, flour and chocolate chips. Mix together until the batter looks crumbly.
  • Form into one inch balls and place onto a cookie sheet. Refrigerate for 30 minutes.

That's it! At this point you can dip them in chocolate, or just drizzling them with melted chocolate is a little less messy but just as good! Happy Baking!

Monday, January 23, 2012

Banana Chocolate Chip Bread


After a long hiatus, Ashley's Sugar Shack is definitely back in the blogging business! I've been baking, but just haven't found the time between the holidays and other things to sit down and officially blog. BUT that's changing as of...now! Here's the first recipe of the new year...a yummy banana chocolate chip bread. It's delicious warm with a pat of butter, or even with a la mode for a decadent dessert! This recipe is also VERY versatile - try using peanut butter chips to replace the chocolate chips. YUM! The recipe is below.

I'm so happy to be back blogging - I didn't realize how much I missed it. Look for lots more yummy recipes in the future! 

RECIPE

1/2 cup unsalted butter, at room temperature
1/2 cup white sugar
1/2 cup brown sugar
1 egg, at room temperature
1 tablespoon sour cream
1/2 tsp vanilla extract
4 very ripe bananas
1 1/2 cups all-purpose flour
1/2 tsp salt
1/2 tsp baking powder
1 teaspoon baking soda
1 tsp cinnamon
3/4 cup semi-sweet chocolate chips
1/2 cup chopped walnuts (optional)
Powdered sugar to garnish
  • Preheat oven to 350 degrees. Lightly grease one 9x5 loaf pan.
  • In a large bowl, cream together butter and sugar until well incorporated. Beat in the egg.
  • Stir in the sour cream, vanilla and bananas. Blend until all ingredients are incorporated.
  • In a separate bowl, combine the flour, salt, baking powder, baking soda, and cinnamon. Gradually add the flour mixture to the banana mixture until just combined. Do not over-mix.
  • Fold in the chocolate chips and walnuts. Put mixture into greased loaf pan.
  • Bake at 350 degrees for 55-70 minutes, or until a toothpick comes out clean. Cool for half hour in the pan before removing to a wire rack to completely cool. Enjoy!

HAPPY BAKING!!

Sunday, December 4, 2011

Ashley's 10 Essential Baking Items

With only having a part time job right now, one of the things that I love about baking is how inexpensive it is. Once I have my pantry supplied with these 10 essential ingredients, I generally only need to purchase 1-3 items to make a recipe. These essentials last me for at least 3 recipes, if not more, and all can be found for under $5.00. I like to shop at Target in their grocery area, which I’ve found to have much lower prices than chain grocery stores. Below you'll find my 10 essential ingredients of baking. :)

FLOUR

Flour was first made in 9000 BC by grinding wheat seeds between stones to produce the fine powder. Now days it's produced in mills, and there are numerous types of flour available. All purpose flour is fine for baking, but if you're making bread (scones, biscuits, etc) you'll want "self rising" flour. Self rising flour has leavening agents that help the bread rise.

WHITE SUGAR

Sugar comes from the plant called sugar cane, and gets it's granulated crystal form by extracting the syrup from the cane and using a vacuum to crystallize the syrup. Brazil has the highest per capita production of sugar.

CONFECTIONER'S (POWDERED) SUGAR

A very fine sugar, confectioner's sugar is mostly used for icings, fillings or frostings. You can make your own powdered sugar by putting regular white sugar and a little corn starch into the food processor and pulse it until a fine powder forms. The corn starch will prevent it from clumping together.

BROWN SUGAR

Brown sugar is essentially the same as white sugar, but has molasses added to it. The darker the sugar, the more molasses is present. Brown sugar gets it's soft texture from the viscous nature of the molasses. Since brown sugar has a maple flavor from the molasses, it can not be substituted for white sugar.

BAKING POWDER

Baking powder is a leavening agent, and is used to increase volume and lighten the texture of baked goods. The carbon dioxide in baking powder expands, making the dough light and fluffy. Baking powder is used in recipes that don't have an acid (lemon juice, buttermilk, yogurt, etc) to react with. You can tell if you're baking powder is still fresh by putting a teaspoon into a glass of hot water. If the baking powder fizzes, it's still active and can be used for baking.

BAKING SODA

Baking soda is also a leavening agent, and is used for the same purpose as baking powder. The only difference is that baking soda needs an acid to react with in order to release carbon dioxide bubbles. When added to a dough or baking mixture, it needs to be used immediately or the baking soda will loose it's chemical reaction and will result in flat cookies or breads.

VANILLA EXTRACT

Vanilla extract is made by macerating vanilla beans in a solution of ethyl alcohol and water. In order for a vanilla extract to be "pure", the FDA requires a minimum of 35% alcohol and 13.35 ounces of vanilla bean per gallon. Also available is "imitation" vanilla extract, which is made with artificial flavors. When baking, the obvious choice is to use the "pure" option, but it can be pricey. I use imitation vanilla extract and it works just fine for me.

COCOA POWDER

Cocoa powder is extracted from cocoa beans, and is made by pressing and milling the liquids away from the solids of the bean. The resulting powder is then processed further to reduce the bitter taste of the chocolate. Cocoa powder contains healthy minerals such as potassium, calcium and zinc.

UNSALTED BUTTER

Unsalted butter is used in both frostings and batters. The only difference between salted and unsalted butter is that granular salt is added to the churning process in salted butter production. It's very important when baking to use unsalted butter. You want to control how much salt is being added to the mixture, and using salted butter can result in an off-putting taste. It's also very important to let the butter soften on the counter for a few hours before use. This allows for even distribution and easy blending of ingredients.

EGGS

Eggs are used to bind together batters, and also act as a leavening agent. Egg whites can be used to make meringues, and egg yolks are used for making custards and creams. To test the freshness of an egg, place it in a bowl of water. If the egg sinks to the bottom, it's still good. The quicker the egg sinks to the bottom, the fresher the egg is. If the egg floats, it's spoiled.

I hope this list provided you a good starting point for your baking pantry, and please don't hesitate to ask if you have any questions about the ingredients listed!

Happy Baking!


Sunday, November 27, 2011

Easy Cinnamon Rolls


Hi everyone! I hope you had a fantastic Thanksgiving weekend and didn't eat or spend too much! I know I did both, but definitely worth it. :) With the holidays coming up, I know this is a time of spending money and those paychecks dwindling down a lot quicker than we're used to! So this month I'm focusing on simple, fast and affordable desserts your whole family will love.

I had a coupon for crescent rolls and was trying to think of something sweet to bake with them. I looked in my boyfriend's cupboard and I saw brown sugar and cinnamon. Of course....cinnamon rolls! I didn't have a recipe, but I quickly thought up something I wanted to try. They turned out SO good, and were SO easy to make! 6 ingredients and 30 minutes later....you've got old fashioned cinnamon rolls. :)

I made the crescent roll dough into rectangles for easy rolling and spread the filling onto the dough in an even layer.


You can use whatever high sided oven safe pan to bake the cinnamon rolls in. I just used a pie pan and it actually worked out really well. They will spread with the cooking process, so a square pan would probably work very well too.


Before

And after 20-25 minutes, you'll have warm, fresh from the oven cinnamon rolls!


After
You could add nuts to the filling as well. You'll notice that in the recipe, there's no set quantity for brown sugar or cinnamon. This is because you can control how sweet the rolls are. If you're a sugar fanatic, pile it on. If you really like cinnamon flavor, sprinkle to your heart's desire. It really just depends on your personal "sweet factor". If you're just getting into baking/learning how to cook, this really is an awesome recipe to start out with.
RECIPE

2 canisters of crescent rolls
3/4 cup butter, softened
Brown sugar
Cinnamon
1 cup powdered sugar
1 tablespoon butter
3 tablespoons milk or water
  • Preheat the oven to 375 degrees. Spray the baking pan with butter flavored non-stick spray or spread a thin layer of butter in the pan.
  • Carefully unwrap the crescent rolls and tear them into rectangular shapes, pinching together seams.
  • Spread the butter on the crescent rolls, then sprinkle brown sugar and cinnamon on top.
  • Roll the dough into a log, then cut into 2 inch sections. Place them vertically into the prepared baking dish.
  • Sprinkle with more brown sugar, if desired, and place into the oven for 20-25 minutes or until golden brown.
  • While the rolls are baking, combine the powdered sugar, butter and milk/water. When the rolls are done, drizzle the frosting over the warm rolls. Enjoy! 
Happy baking! Have a wonderful week, and look for another easy recipenext Sunday! :)

Friday, November 25, 2011

Pumpkin Whoopie Pies


As promised (okay, it's technically Saturday, but shhh..), this post will focus on Pumpkin Whoopie Pies. So...I like pumpkin. A lot. Before Thanksgiving, I went on a pumpkin spree. Waffles, bars, pancakes, and whoopie pies. What exactly is a "whoopie pie"? A deliciously sweet filling is stuffed in between two fluffy, light cookies. Traditionally they're made with chocolate cookies, but I decided to live on the wild side and try them with pumpkin puree. And they turned out to be pretty much the best thing on Earth. No joke.

The cookies are so airy, it seems like they will float off the cookie sheet. And are super simple to make! I experimented with different fillings (all powdered sugar, traditional marshmallow creme) and by far the best one I tried is a classic buttercream filling. It brings out the natural spices of the pumpkin cookie, and is so dang good you can't just have one!

This is what the cookies will look like after being removed from the oven. I used a small ice cream scoop and it worked wonderfully to keep a nice circular shape and allowed for even cooking. You can fit quite a few on a single cookie sheet as well. They will be done in 9 minutes, then 1 minute on the pan until they can be transferred to a cooling rack. Make sure the cookies are completely cooled before filling them.


RECIPE
Adapted from AllRecipies.com
2 cups packed brown sugar
1 cup vegetable oil
1 1/2 cups pumpkin puree
2 eggs
3 cups flour
1 teaspoon salt
1 teaspoon baking powder
1 teaspoon baking soda
1 teaspoon vanilla extract
1 1/2 tablespoons pumpkin pie spice
1/2 tablespoon cinnamon
  •  Preheat oven to 350. Lightly grease baking sheet.
  •  Beat oil and brown sugar until combined. Add the pumpkin and eggs, beating until well incorporated.
  • Add flour, salt, baking powder, baking soda, vanilla, pumpkin pie spice and cinnamon. Mix together well.
  • Scoop dough with a small ice cream scoop onto prepared baking sheet. Bake for 9 minutes, then leave on the pan for 1 minute. Carefully remove the cookies and place them on a cooling rack until they're cool enough to fill.
    FILLING
    1/2 cup butter, softened
    2 cups powdered sugar
    1/2 teaspoon vanilla extract
    1/2 teaspoon cinnamon
    3 tablespoons hot water
    • Blend butter and vanilla extract until combined.
    • Gradually add powdered sugar one cup at a time. Add cinnamon.
    • Add water one tablespoon at a time, until desired spreading consistency is obtained. This could require more or less water.
    I HIGHLY recommend trying this recipe out. It always amazes me how many compliments I get on them! One little tip though - don't stack the pies. Since the cookie is so light, they have a tendency to stick together. Use a piece of parchment to seperate the layers.

    Happy Baking!