Showing posts with label beginner baker. Show all posts

Tuesday, April 10, 2012

Peanut Butter Banana Oatmeal Bars


Okay, so a little side track on my usual sweet side. I found this recipe over here at Gingerbread Bagels and tried it simply because I had all the ingredients and was looking for healthier options. My boyfriend and I are trying to eat healthier, and these seemed like a good substitution in place of my usual sweet treats. 

I wasn't sure how these were going to taste, as they have no oil, butter and only have 1/4 cup of sugar. I was pleasantly surprised though! They taste healthy, but not like eating cardboard. I had one for breakfast with a little slab of peanut butter and an orange and it was enough to easily hold me over until lunch without feeling super full. They were moist and SUPER easy to put together!

I changed the recipe a bit, as the original one didn't have enough sweetness or peanut buttery goodness for my tastes. You could also add chocolate chips, cranberries, or other dried fruit to add a little something extra!

RECIPE

1 1/2 cups quick cooking oats
1/4 cup light brown sugar
1 tsp baking powder
1 teaspoon cinnamon
1/8 tsp nutmeg
1 teaspoon vanilla extract
1/2 cup milk
1 egg
2 large bananas, mashed
1/3 cup creamy peanut butter (you could use crunchy if that's in your pantry)

- Preheat the oven at 350* and spray an 8x8 baking pan with Pam or butter. Set aside.
- Mix together the oats, brown sugar, baking powder, cinnamon, and nutmeg in a large bowl.
- Add the vanilla, milk and egg. Combine until thoroughly incorporated.
- Stir in banana and peanut butter. Pour mixture into the prepared pan and bake for 20 minutes. Let cool in the pan for a bit before serving. Enjoy!

Happy Baking!!

Ashley


Wednesday, March 21, 2012

Deconstructed Apple Cranberry Pie

I wish this picture did the pie more justice, but it's all I had before it got gobbled up. This is incredibly easy and quick to throw together! If you have a lot of apples you need to use up, this is definitely the recipe to use! Puff pastry can be found in the freezer section, and bakes up so light and fluffy. Don't be intimidated by the name...it couldn't be easier to work with! Add some vanilla ice cream on the side with a sprinkle of cinnamon and dig in!

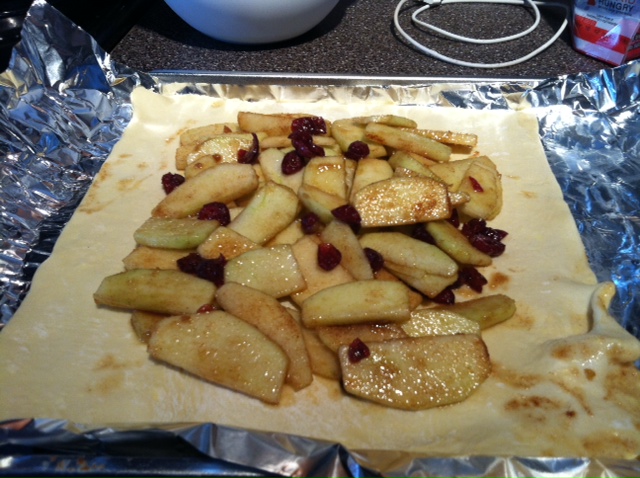
PILE on the apples in the center of the pastry. The apples will shrink a bit and the pastry will puff and expand, so it will even out once the baking is complete.
Baking in the oven!
RECIPE
4 granny smith apples, peeled and cut into 1/4 inch slices
1/2 cup dried cranberries
1 cup brown sugar
1/2 of a lemon
2 tsp cinnamon
1/8 tsp nutmeg
1 package puff pastry shell (found in freezer section)
1 egg, beaten

-Take puff pastry out of packaging and let sit at room temperature for 30 minutes, or until it's easy to unfold and work with.
-Combine apples and lemon juice right away to prevent browning. Add cranberries, brown sugar, cinnamon and nutmeg. Set aside for 15 minutes to let flavors mingle together.
-Spray a cookie sheet with non-stick cooking spray and place puff pastry on it. Pour the apple mixture in the middle, and leave 1-2 inches around the edges for folding.
-Lift the edges of the pastry shell over the apple mixture. You may have to gently stretch the pastry dough. Brush the egg wash over the pastry.
-Place in the oven for 45-55 minutes or until golden brown.
-IMPORTANT - Let cool completely before you move it. The puff pastry is very delicate, and you may tear the bottom if you mess with it too much (personal experience). If you
want to serve it warm, place in the microwave for 10-15 seconds or until warmed.

Happy Baking!

Ashley

Saturday, March 17, 2012

Ashley's Loaded Brownies


The busier my life gets, the more I'm thinking about other people's lives and how busy they are. When I'm stressed or overwhelmed or just plain grumpy, baking is my go-to that makes me happy and back to normal again. I want to share this passion with others, and want my recipes to be accessible and enjoyed from everyone to the expert baker to the person who is intimidated by baking. For the next few months, I've decided to focus my blog on baker-friendly, budget-conscious recipes. I sure hope you enjoy them!

The first one is an idea I found on Pinterest...a post about roasting marshmallows under the broiler of your oven and making s'mores. Umm, pure genius if you ask me. My mind started reeling and I came up with this overload brownie concoction. They're easier to eat and cut if they're at room temperature, but feel free to get your hands and mouth sticky with marshmallow-y goodness when they are warm. :)

TIP - When cutting the brownies, run the hot water on your tap and rinse the knife before every cut. Makes life MUCH easier. :)


Before the broiler

After with roasted goodness! You can toast them more or less based on your preference

RECIPE

Your favorite brownie recipe, or a prepared box mix
1 package mini marshmallows
1/2 cup creamy peanut butter
2 tsp powdered sugar

- Turn on the broiler on high in your oven, and place the metal oven rack so the brownies are 3-4 inches from the broiler, so whatever level that is in your oven.
- Pour marshmallows onto pre-baked brownies, making a single layer over the brownies. It's okay if a few are sticking out.
- Place under the broiler and WATCH THEM. Do not walk away unless you like your marshmallow EXTRA toasty. They will cook very quickly, so watch until your desired "roasty-ness" for the marshmallows is complete. You may have to rotate the pan to get even browning. 
- Peanut Butter Drizzle - Place peanut butter in a microwave safe bowl and heat for 20-30 seconds, or until smooth and thinned out a bit. Stir in powdered sugar until mixed in thoroughly.
- Once the marshmallows are done roasting, drizzle the peanut butter mixture onto the marshmallows. Let cool for half hour before digging in (unless you like a warm, sticky brownie concoction, then go for it! :)

Until next time, Happy Baking!

-Ashley-


Wednesday, January 25, 2012

Chocolate Chip Cookie Dough Balls


Okay, so there's this website...Pinterest, Basically a website that you wonder where the last 2 hours went because you were on it. It's a site FULL of neat ideas, crafty fun projects, DIY, style, food, etc. Best thing since sliced bread, no joke. Anyway, I tried this basic recipe to see how it worked out and goodness gracious! These things are little balls of HEAVEN. They taste just like cookie dough, AND they're safe to eat (no egg!). This is a fantastic recipe to do with kids (if you can keep them from eating it all), and SO versatile! My mind is reeling from all the possibilities...peanut butter cups, butterscotch, almond extract, peppermint patties, walnuts...I could go on forever! I dipped mine in chocolate, but they are delicious without it as well! Below is the base recipe, but let me know what amazing concoctions you come up with!

RECIPE

1 cup salted butter, softened
1 1/2 cups brown sugar
1 tsp vanilla extract
2 cups flour
3/4 cup chocolate chips (mini work best, but regular size is just fine too)

  • Blend together butter and brown sugar until light and fluffy.
  • Add vanilla, flour and chocolate chips. Mix together until the batter looks crumbly.
  • Form into one inch balls and place onto a cookie sheet. Refrigerate for 30 minutes.

That's it! At this point you can dip them in chocolate, or just drizzling them with melted chocolate is a little less messy but just as good! Happy Baking!

Sunday, November 27, 2011

Easy Cinnamon Rolls


Hi everyone! I hope you had a fantastic Thanksgiving weekend and didn't eat or spend too much! I know I did both, but definitely worth it. :) With the holidays coming up, I know this is a time of spending money and those paychecks dwindling down a lot quicker than we're used to! So this month I'm focusing on simple, fast and affordable desserts your whole family will love.

I had a coupon for crescent rolls and was trying to think of something sweet to bake with them. I looked in my boyfriend's cupboard and I saw brown sugar and cinnamon. Of course....cinnamon rolls! I didn't have a recipe, but I quickly thought up something I wanted to try. They turned out SO good, and were SO easy to make! 6 ingredients and 30 minutes later....you've got old fashioned cinnamon rolls. :)

I made the crescent roll dough into rectangles for easy rolling and spread the filling onto the dough in an even layer.


You can use whatever high sided oven safe pan to bake the cinnamon rolls in. I just used a pie pan and it actually worked out really well. They will spread with the cooking process, so a square pan would probably work very well too.


Before

And after 20-25 minutes, you'll have warm, fresh from the oven cinnamon rolls!


After
You could add nuts to the filling as well. You'll notice that in the recipe, there's no set quantity for brown sugar or cinnamon. This is because you can control how sweet the rolls are. If you're a sugar fanatic, pile it on. If you really like cinnamon flavor, sprinkle to your heart's desire. It really just depends on your personal "sweet factor". If you're just getting into baking/learning how to cook, this really is an awesome recipe to start out with.
RECIPE

2 canisters of crescent rolls
3/4 cup butter, softened
Brown sugar
Cinnamon
1 cup powdered sugar
1 tablespoon butter
3 tablespoons milk or water
  • Preheat the oven to 375 degrees. Spray the baking pan with butter flavored non-stick spray or spread a thin layer of butter in the pan.
  • Carefully unwrap the crescent rolls and tear them into rectangular shapes, pinching together seams.
  • Spread the butter on the crescent rolls, then sprinkle brown sugar and cinnamon on top.
  • Roll the dough into a log, then cut into 2 inch sections. Place them vertically into the prepared baking dish.
  • Sprinkle with more brown sugar, if desired, and place into the oven for 20-25 minutes or until golden brown.
  • While the rolls are baking, combine the powdered sugar, butter and milk/water. When the rolls are done, drizzle the frosting over the warm rolls. Enjoy! 
Happy baking! Have a wonderful week, and look for another easy recipenext Sunday! :)